Despite having tons of new things, Windows 8 also eliminates
many traditional features such as Start menu. One more thing that
Windows 8 lacks the ability to create Ad-hoc networks. Ad-hoc network is
a very powerful Windows feature for sharing your Internet connection
with other devices (phone, tablet, other computers, etc.). In the
general, with Ad-hoc network, you make your computer a Wi-Fi hotspot and
other Wi-Fi enabled devices can use your Internet connection.
Unfortunately, Windows 8 can not longer make Ad-hoc networks. It can,
however, still share an Internet connection with other devices (phone,
tablet, other computers, etc.) using a hosted network (which is similar to Ad-hoc network). In this article, I will show you how to set up a hosted network in Windows 8.
(Using a hosted network can also be thought of as tethering your Internet connection.)
Step 1: CHECK FOR COMPATIBILITY TO CREATE HOSTED NETWORK
First of all, you have to check whether your wireless card supports
hosted network. To do this, you should open Command Prompt by pressing
Windows button (on tablet, swipe from the right edge then choose Search
button) then type “cmd” (without the quotes). You may see the “Command
Prompt” result on the left side and you have to right click/long tap on
it then choose “Run as administrator” in the app bar below.

In Command Prompt window, you should run this command to check your wireless card: ‘netsh wlan show drivers‘ (without the quotes).
After the process has finished, you need you focus on the line
“Hosted network supported.” If it shows “Yes,” that means you can create
a hosted network, and the “No” answer means you can’t.

STEP 2: CREATE A HOSTED NETWORK
If you still in Command Prompt window, you are ready to go. If you
don’t, just simple open it again. To create a hosted network, you should
do these steps.
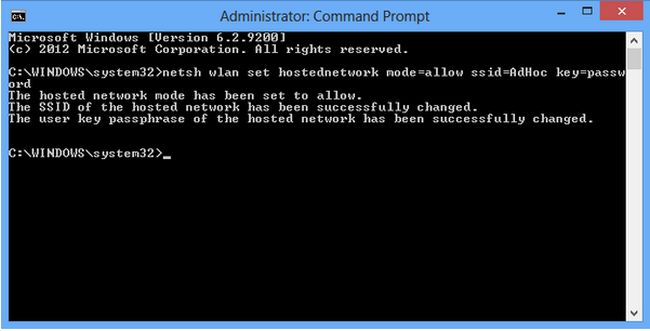
- Enter this command in Command Prompt window then press enter.
netsh wlan set hostednetwork mode=allow ssid=networkname key=password
- In the command, networkname and password is the name
and password you want to set for your network. For example, I can create
a network named “sample” with password “123456789” by this command
netsh wlan set hostednetwork mode=allow ssid=Sample key=123456789
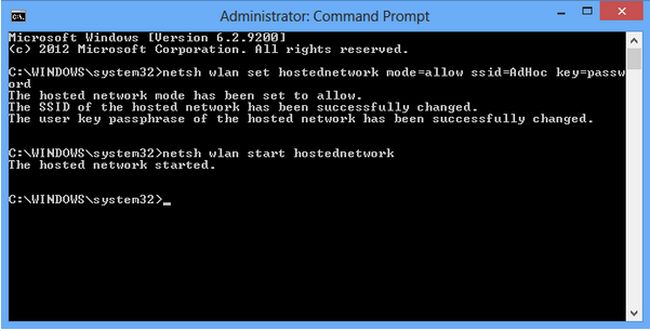
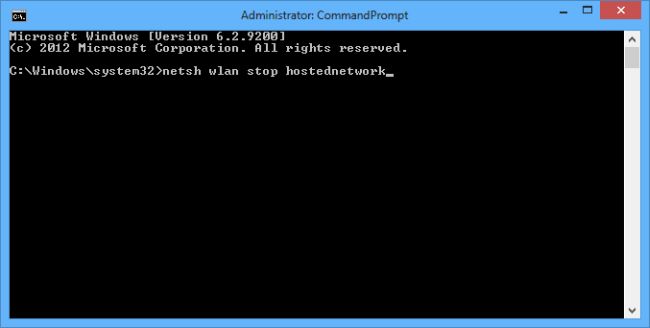
- After that, you network now has been created. What you have to do next is turn it on by enter this command.
netsh wlan start hostednetwork
- Once you see the line “The hosted network started,” that mean you successfully create a hosted network.

STEP 3: SETUP THE NETWORK
After creating the hosted network, you just have to do some simple things to make it available to other devices.
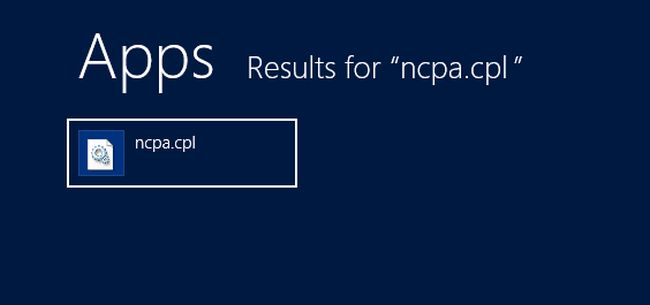
- Open “Network and Sharing Center” by right click/long tap on the
network icon in system tray then choose “Open Network and Sharing
Center.”
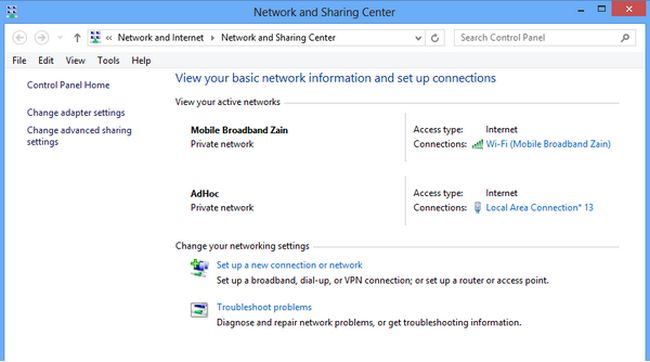
- In Network and Sharing Center window, you can see your current
connected network. In my example, the current one is named “ZOOM” which
is a Wi-Fi connection; I have to click on the blue line “Wi-Fi (ZOOM)”
that places on the right side. Additionally, I notice that my hosted
network’s connection name is “Local Area Network *14.”

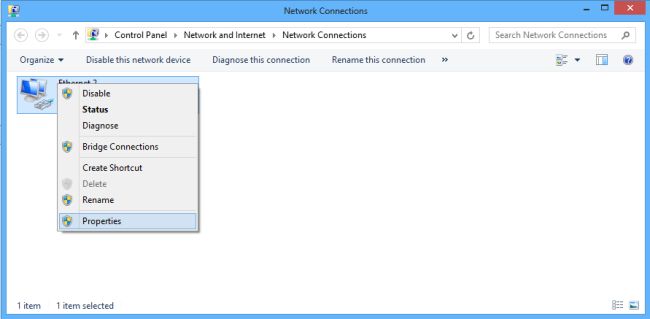
- Then I should click “Properties” button in the new opened window.
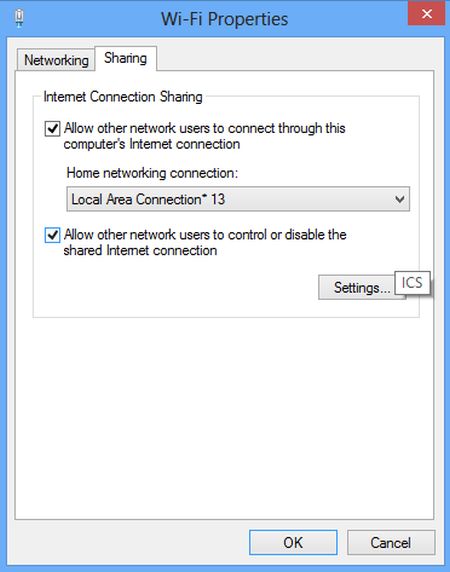
- In Properties window, I will choose “Sharing” tab then check the box
“Allow other network users to connect through this computer’s Internet
connection.”
- Below that is a drop down list, I will choose it and select “Local Area Network *14,” which is my new hosted network.
- Finally, I just click OK button and wait for it to be finished.

- In the photo below, I use an iPhone to connect to my hosted network. And it just works perfectly.

CONCLUSION
In my opinion, this is a very interesting thing in Windows 8. Before I
had a Wi-Fi router in my house, I had used this feature to share my
desktop computer’s Internet to my phone. Hope you can find this article
helpful.

About the author: Hoàng Tú View all posts by Hoàng Tú
Since Tu knew what is a computer, he
has become a Microsoft addict. He has a ton of experiences in Windows,
Microsoft's software and Windows Phone. Writing for dotTech is not only a
habit but also a great chance for his future career - a tech writer.


 Email article


![[Android] Greatly improve speed and performance of your smartphone or tablet with LagFix](http://cdn.dottech.org/media/2013/03/LagFix-Free-Start-Screen-134x90.jpg)
![[Android] Block apps from accessing the internet with Mobiwol, a firewall that does not require root](http://cdn.dottech.org/media/2013/03/mobiwol_1-134x90.jpg)
![Want easy-to-remember and secure passwords? Use passphrases instead of complex passwords [Tip]](http://cdn.dottech.org/media/2013/03/keyboard1-134x90.jpg)
![[Windows] Best free clean uninstaller — Revo Uninstaller vs IObit Uninstaller vs GeekUninstaller vs Comodo Programs Manager](http://cdn.dottech.org/media/2013/03/2013-03-14_211112-134x90.png)




Thanks for this article, I’ve saved myself a copy.
I don’t currently have a tablet but I’m looking at a Nexus 7 for the future.
What the hell were Microsoft thinking by making things this complicated? Tethering phones and tablets is one of those “up and coming” often-needed computer applications for today.
I tried this out. But does it really happen that the network is not saved? I need to make a new one everytime I close my PC. Isn’t this connection ever saved?
thanks, it works!
The part where you connect to local area network, mine only gives me the option of wifi
mine says the hosted network couldnt be started.
A device attatched to the system isnt functioning. Help please
if it appear like this..what should i do?
“the hosted network couldn’t be started. The group or resource is not in the correct state to perform the requested operation”….
your help will be very useful..
everything was successful except for i cannot access the internet in my phone? it shows in my wifi but i cant access net even if i already enterd the password,.